4 minutes
Smart Home: Freezer temperature sensor! ❄️
Lately we’ve had the problem that our freezer sometimes simply turns off. Which is of course not that great because our ice cream, and frozen pizzas were defrosted and obviously some other food as well.

So I decided to use IoT to develop some kind of early warning system when the temperature in our freezer will start to raise.
Components i used for this project: - Raspberry PI 3 Modell B+ (as our MQTT Broker and to run Node-RED)
- ESP8266 NodeMCU (to send the temperature data via the MQTT protocol)
- DS18b20 temperature sensor (for measuring the actual temperature in the freezer)
At first I took a breadboard and tested the temperature sensor in combination with the ESP8266. The DS18b20 sensor has 3 pins: red (VCC), yellow(DATA) and black(GND). I decided to connect the DATA-Pin to pin D7(GPIO13) on the ESP-Board, which is a normal I/O pin or for SPI data. All in all, it’s not very complicated to connect the DS18b20 to the ESP8266. Just have a look at the complete breadboard layout down below.
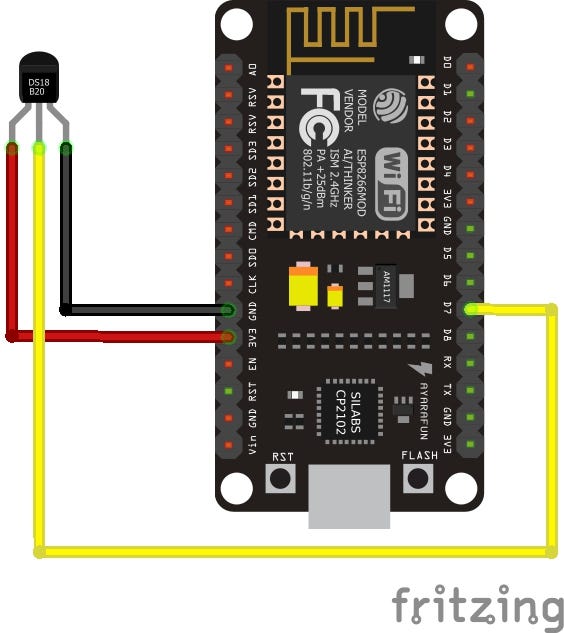 Fritzing connection layout
The next step was to programm the ESP8266 so it is possible to receive the current temperature and send it via MQTT to our broker. I used the Arduino IDE to programm the microcontroller.
I used 4 different libraries:
- ESP8266WiFi library (for connecting the ESP with our local WiFi)
- PubSubClient (an arduino client for MQTT)
- OneWire (library for Dallas/Maxim 1-Wire chips)
- DallasTemperature (arduino library for maxim temperature integrated circuits)
All we now have to do is connecting our ESP via WiFi to our local network so it can access our MQTT-Broker, which we’ll later run on our raspberry pi. Then we need to connect to our broker via the PubSubClient library. After this is all set up we can start to readout the temperature from the sensor and publish it to the MQTT topic “sensor/temperature”. It’s really no rocket science 🚀. The complete documented code can be found in the fridgy-temp repo on my github page. fklement/fridgy-temp fridgy-temp - ESP8266 with an DS18b20 temperature sensorgithub.com
The next step now is to setup the raspberry pi. I installed mosquitto and configurated everything. A good tutorial for installing mosquitto with a quick intro into MQTT can be found here 👈.
Afterwards I set-up Node-RED, which is a flow-based development tool. I decided to go for this plattform because it allows you to easily setup your IoT-Service. You can simply wire all your devices and needed tools visually together and have the ability to provide a cool dashboard. Of course you can do much more but, for our application purpose this is all we need. A currated list of features and a getting started guide can be found in the docs. 📚
Our freezer has a standard temperature around -21/-22 °C (-5,8/-7,6 °F). I wanted to send myself an email when the temperature raises to ≥ -19°C. So I started to implement an Node-RED flow with some different nodes for checking the temperature and triggering an email if the temperature is greater than my setted threshold.
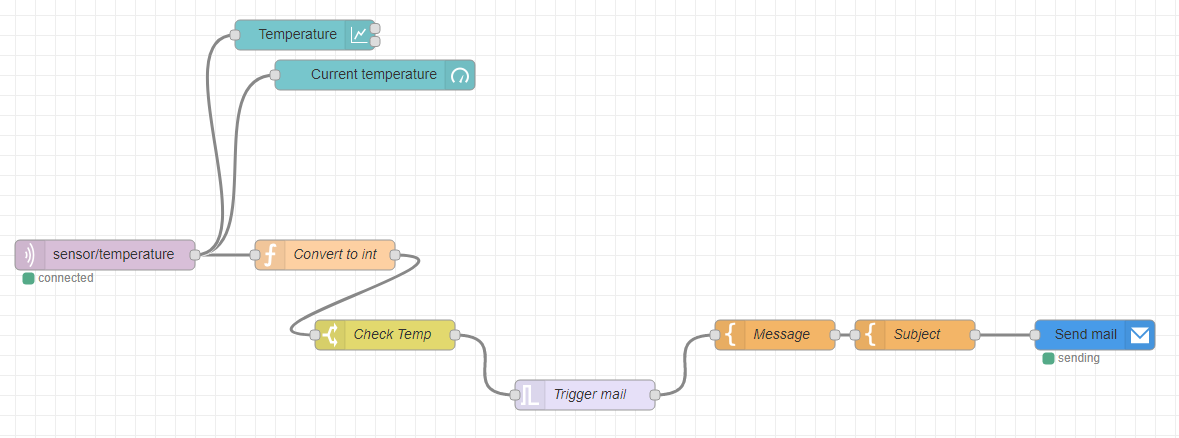 Node-RED flow for checking the temperature and sending an email
I also implemented a simple Dashboard to visualize the temperature course in relation to time and to display the current freezer temperature. This was easily done with the node-red-dashboard package. Which provides a dashboard UI for Node-RED. The flow can be also found in the above-mentioned repo.
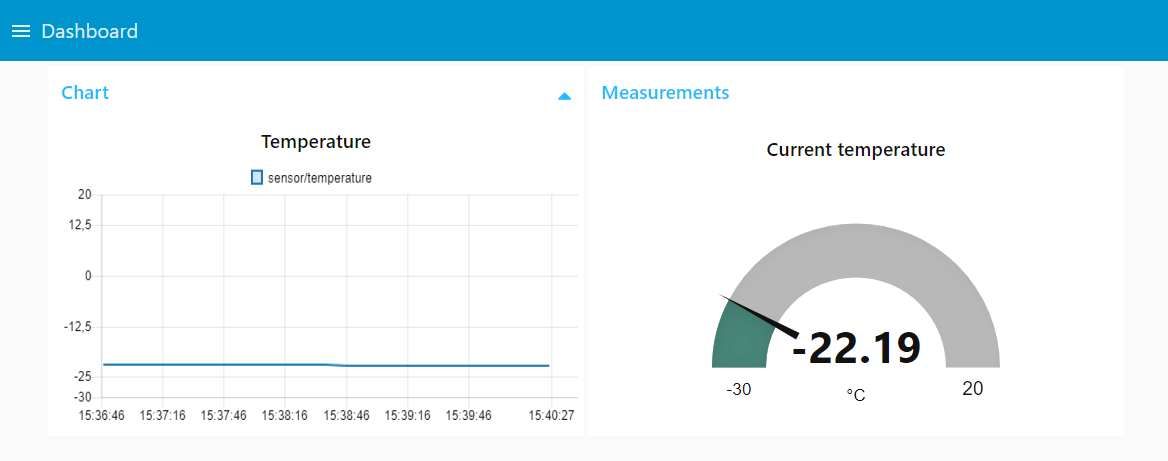 Node-RED dashboard for visualization purposes
Now that the sensor is tested and all software parts work, I started to design a case housing for our microcontroller. I used crashoverride’s ESP8266 ESP-12E nodeMCU Lua Case as my base. I changed some small things via tinkercad, which is a really nice 3D CAD design tool by the way and et voilà we’re ready to print the casing!
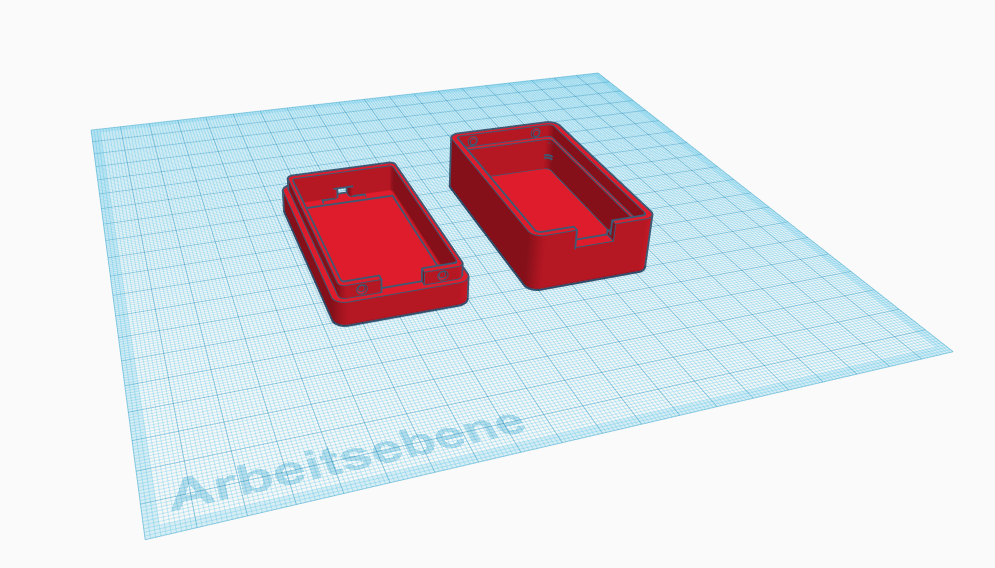 CAD model for our housing
While my 3D printer printed out the case, I soldered the parts together on a hole pattern board and inserted a flat ribbon cable into the middle of our cable. The reason is that I just pinch the cable into the door and thus the rubber lip of the freezer is not pressed so far apart.
In the near future I want to add a little microcontroller for our office, with a passive buzzer module as an additional alarm when the temperature increases. I already ordered some buzzer modules, but it will take some time until they will arrive from Hong Kong. In summary, it was a really cool project for a Saturday afternoon.